Hi all,


Steps to create a node profile on Machine B


“Effort only fully releases its rewards after a person refuses to quit”
Regards,
Here are the scenario where we going to discuss the horizontal clustering of Websphere Application servers v8.5. Horizontal clustering, sometimes referred to as scaling out, is adding physical machines to increase the performance or capacity of a cluster pool. Typically, horizontal scaling increases the availability of the clustered application at the cost of increased maintenance. Horizontal clustering can add capacity and increased throughput to a clustered application; use this type of clustering in most instances. Here we have two machines Machine A and Machine B
Prerequisites:
Install WAS ND using the new IBM Installation Manager on both machines.
Create a Deployment Manager profile on Machine A.
Steps to create a node profile on Machine A
- Before we create the profile we will log into the Administrative console of our running deployment manager. Navigate to the System administration >Deployment Manager and note down the SOAP Port for Node Creation.


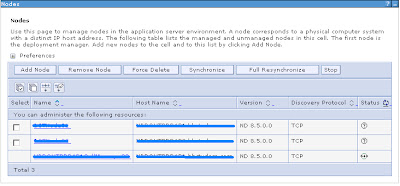
- Navigate to the System administration section located in the left-hand-side panel of the admin console. In the Nodes screen we get a listing of the available nodes and their status.

- Launch the PMT tool. To launch the PMT tool, On Windows you can use the Programs menu and Click Create the start the wizard

- Select Custom profile

- Click Next to continue on to the Profile Creation options page and select advanced profile creation. We do not want to use the typical profile creation option as we will be given default profile naming conventions and as we will not be able to decide on the location path for the node profile.

- Click Next to move onto the Profile Name and Location screen. enter nodeName in the Profile namefield and change the Profile directory path to be as follows: <was_root>/profiles/ nodeName for example: D:\IBM\WebSphere8\AppServer\profiles\node01
- We will not set the “Make this profile the default” field as we want the Deployment manager to be the default profile.
- Click Next to move on to the Node and Host Name screen. Enter Testnode01 for both he Node name and localhost for HostName of Machine for Hostname fields.

- Click Next to define the node federation options. On this screen we define the location of a running deployment manager. We need to know the hostname and SOAP port of the dmgr. If the dmgr is running on the same machine we can use local host of the hostname as specified in your localhost. When you click next the node will be created and automatically federated in to the dmgr’s managed cell. This node becomes a managed node.The federate this node later option can be used if you wish to post pone federation until another time.
Note:A command line tool called addNode.bat or addNode.sh can be used to federate a node.
- Click Next.

- On the Security Certificate (Part 2)screen the PMT will set a default certificate for the node.
- After verifying the certificate definition for the node, Click Next.
- The next screen presented is the Port Values screen. Accept the default, but take note of the ports. Key ports have been incremented by 1 from the dmgr ports. Click Next to review the summary and then click Create to being the Testnode01 profile creation process.

- Once the profile creation has finished you is it possible run the First Steps. In this example we will not run the FSC. We are going to start the node manually via the command line.
- Click Finish. You will see the PMT profile tab now lists the new Testnode01 profile.
- Close the PMT.
- Now that the Testnode01 profile has been created and federated into the cell. We will look into the Administrative console to see the new node is now listed along with the dmgr node. Open the Administrative console and navigate to the System Administration>Nodes section as we did at the beginning of the module. We can now see Testnode01 has been federated into the cell and is now a managed node.

Note: We did not need to restart the Deployment Manager to see the additional node. In older versions of WAS a restart of the dmgr was a requirement.
Steps to create a node profile on Machine B
Follow the same steps to create the Testnode02 on machine B as described for Machine A. But in step 9 while define the node federation options we need to defile the hostname and SOAP port of the dmgr running on the Machine A. Now that the Testnode02 profile has been created and federated into the cell. We will look into the Administrative console to see the new node is now listed along with the dmgr node. Open the Administrative console and navigate to the System Administration>Nodes section as we did at the beginning of the module. We can now see Testnode02 has been federated into the cell and is now a managed node.

Creating cluster in horizontally scaled Cell design Creating a cluster
It is possible to create a cluster in different ways. In our example we will create a JVM on Testnode01, then upgrade it to a cluster and add another clone.
To create a server, follow these steps:
- Select Server Type form the Server section located in the left-hand-side of the administrative console, then click WebSphere Application Servers.
- In the Application server listing screen, click New.


- Within the Create a new application server screen, select Testnode01 (we have two nodes on this system). Type Testserver01 in the server name field. Click Next.


- On the following page, select Default template. In production you would use default.
- Click Next
- The next screen will present an option to turn toggle the Generate unique ports option. This setting generates unique port numbers for every transport that is defined in the source server, so that the resulting server that is created will not have transports which conflict with the original server or any other servers defined on the same node. When you are installing multiple JVMS on the same systems, you can get conflicts with port numbers. If you design your Cell to allow only one single JVM per node, then you could use the default port options, however this can be problematic.
- Review and click Finish.


- Once the server has been created, click Save to ensure that the configuration is permanently stored.
- You can see that the server is currently stopped.

- Validating the node synchronisation
- If we quickly navigate to the Nodes view, we will see that the Nodes are now out of Sync. To display Node synchronisation status, then navigate to System Administration > Nodes
- Below is what you should see, if any of the nodes turn green it means they are one again in sync with the deployment manager.
- After a period of time the node will sync.
- It is possible for the node and cell configuration to be out of synchronization after this operation is performed. If problems persist, use Full Resynchronize.
Starting the server
We will not start Testserver01 using the console, then we will stop is via the command line after viewing the logs.
- Navigate to Servers > Server Types > WebSphere application servers
- Now we need to start the server and view the server’s logs.
- Select Testserver01 Click Start
- Open a command prompt or shell to <was_root>/profiles/Testnode01/logs/Tesrserver01
- Open the SystemOut.log
- Once you have opened the server’s log file, then scroll to the bottom of the log file and look for line similar to the following:[01/11/11 11:38:45:528 GMT] 00000000 WsServerImpl A WSVR0001I: Server Testserver01 open for e-business
Creating a cluster and clone from an existing server
In this section we take our existing JVM (Testserver01) and make it into a clone (member) of a cluster.
Steps to create a cluster and convert a server into a clone
- Navigate to Servers > Clusters > WebSphere application server clusters as seen below.
A list of clusters is presented. We have no cluster at this point, so it is empty. Click New to start the “Create a new cluster” wizard.


- Type the name Testcluster01 into the Cluster name field.
- Click Next to move onto the Create first cluster member screen. In this example we want to convert an existing server to become a member of this cluster. Select the create the member using an existing application server as a template option as seen below


- Click Next to move onto the screen where you can add additional cluster members. In this case we are going to add a new member to TestNode02.
- Click the Add member button to add the new cluster member, the result is as seen below.

- Click Next to review the final summary screen, and then click Finish to create the cluster.
- Click Save to ensure the new cluster is saved.


- The WebSphere application servers clusters view will list the current cluster in the cell.
- Make sure you are back on the Cluster view screen and click Start
- You can see that the Status is Partially started. This is because each member (clone) will be started in sequence and once both servers (members) as started the console will report a green status meaning the cluster if full started. Full started means that all members of the cluster have started. Below is an example for a fully started cluster
- We have now completed the essentials of the cluster creation process. What we need to do now is deploy an application to the cluster so we can verify that the Cluster works and we can access each server’s (cluster members) web-container.
Hope this will help you to create a cluster and we will see how deploy an application to the cluster so we can verify that the Cluster works and we can access each server’s (cluster members) web-container in next blog.
“Effort only fully releases its rewards after a person refuses to quit”
Regards,


No comments:
Post a Comment