Friday 16 June 2017

How to install Internet Information Services (IIS) v8.5 Webserver on Windows Server 2012

Hello Everyone,

Today I am installing IIS Webserver on Windows Server 2012. Before start the installation I have gather some info about the product and it's working and hope it will help you to understand the product.

What is IIS ?


Internet Information Services (IIS) is a flexible, general-purpose web server from Microsoft that runs on Windows systems to serve requested HTML pages or files
An IIS web server accepts requests from remote client computers and returns the appropriate response. This basic functionality allows web servers to share and deliver information across local area networks, such as corporate intranets, and wide area networks, such as the internet.
A web server can deliver information to users in several forms, such as static webpages coded in HTML; through file exchanges as downloads and uploads; and text documents, image files and more.

How it Works ?


IIS works through a variety of standard languages and protocols. HTML is used to create elements such as text, buttons, image placements, direct interactions/behaviors and hyperlinks. The Hypertext Transfer Protocol (HTTP) is the basic communication protocol used to exchange information between web servers and users. HTTPS -- HTTP over Secure Sockets Layer (SSL) -- uses Transport Layer Security or SSL to encrypt the communication for added data security. The File Transfer Protocol, or its secure variant, FTPS, can transfer files

How to install IIS ?


To install the IIS Let's Login to the Server and click on menu and the select the below icon to open Server Manager


Once you open the server manager click the option Add roles and features. You can find the same option  under Manage.


Click on the Next to continue


On installation type page you can select IIS to run on physical computer or virtual machine. Here we are selecting Role-based or feature-based installation for physical computer. And click Next


Select the default server and click Next


Select the option Webserver (IIS)


Click Add Features and click Next


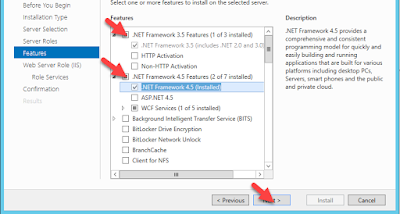
These are the default .NET Framework keep them and select Next


On Webserver role page it will give you the information about the product. Click Next


You can customize the Webserver by selecting options accordingly, here I am keeping it by default. Click on Next


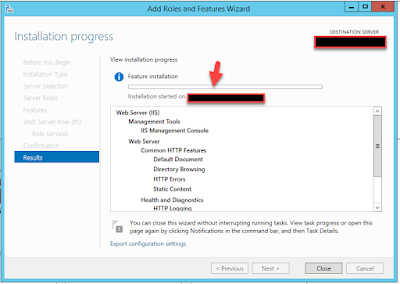
Click on Install to start Installation.


It will show you the product details and progress bar once completed click on close.


How to verify the Installation ?


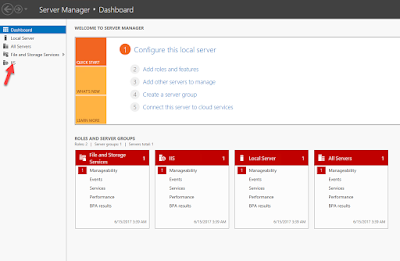
Open Server manager again and you can see the IIS listed there.


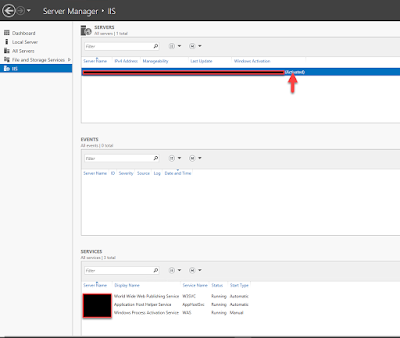
Click on IIS it will show you all running services and shows IIS activated.


To check the IIS open the IIS Manager by running inermgr in Run


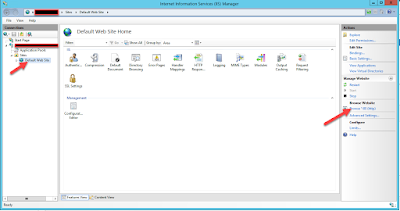
Expand the server name click on Default Web Site  and then click on Browse *:80(http). It's a by default webpage to test.


If you get below webpage means your installation is successful


Hope this will help you. Kindly comment for your suggestion and quires.   


"Effort only fully releases its reward after a person refuses to quit.”

Regards,

Akhilesh B. Humbe

Wednesday 31 May 2017

How do I change user password when connected to Windows Remote Desktop ?

Hello everyone,

Hope you all are doing well. It's after 3 years I am again get a chance to work on the Windows environment and started getting basic issues also. Here is the first issue which we are discussing. Today first time I took RDP session of my windows server 2012 and want to change my default system generated password and when I was trying to press CTRL+ALT+DEL it was showing me an options for my local windows10 machine not for the RDP servers. When I did some net surfing I got a below options. You can use either of them. It's for two different situations and second one is applicable in both situation

Change password when connected to Windows Remote Desktop


Simply Press CRTL+ALT+END

This is in essence the same thing as CTRL+ALT+DEL, it will display the login security screen where you can change the password, lock the computer, shut down, etc.


 Change password when connected to HOP Servers


I have to agree, CTRL + ALT + END is not an option if you e.g. have to use "HOP servers" (RDP connection from another RDP session).
This is quite common scenario, and if user is not local admin, he is not able to reset password as well. In this case use below trick.

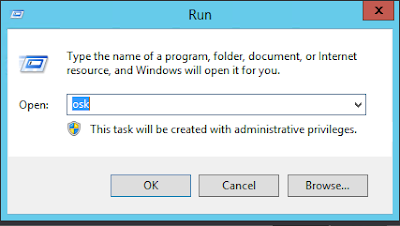
Press WindowsKey+R (or get the Run box open)


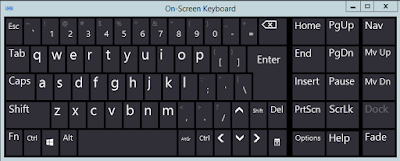
Then type OSK (It will open ‘on-screen-keyboard in your remote-remote session). Or open on-screen-keyboard in different way. 


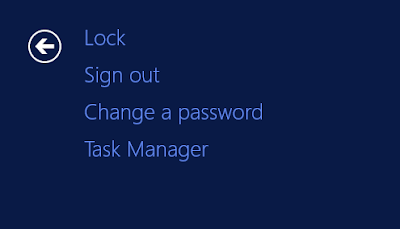
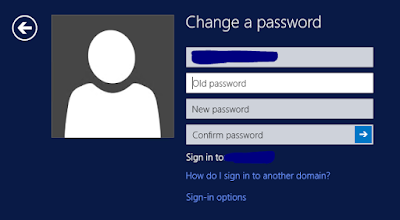
Then press on your physical keyboard (not on that on screen!!) ctrl and alt keys. Using your mouse click DEL key on ‘On-screen-keyboard’ and you will get the below options


 Click on change password and reset the password.


You can use this trick for RDP and HOP as well.

Hope this will help you. Kindly comment for your suggestion and quires.   

"Effort only fully releases its reward after a person refuses to quit.”

Regards,

Akhilesh B. Humbe

Thursday 2 February 2017

How to reset password for admin user in jboss ?

Hello everyone,

Hope you all are doing well. Today we are discussing the scenario where we need to change the admin password of jboss application server to access into the admin console. It happens normally that we forgot the admin password or need to change password on timely basis for security purpose.

Please flow the below procedure to reset the admin password.

Procedure:

I assume that you all know how to add admin user to the jboss environment before changing the password for it.

When we have added the user to the environment the details of the user did store in the files.
 /<JBOSS_HOME>/domain/configuration/mgmt-users.properties
/<JBOSS_HOME>/standalone/configuration/mgmt-users.properties  


To change the admin password go to these two files and delete the user
delete the line such as  admin=2c7123264278731425d1f53aeb55da1edfghsdef [username=password]


After deleting these two entries Go to the location /<JBOSS_HOME>/bin and run the command ./add-user.sh and add user again.

Restart of Jboss services not require. 

This one is the easiest process to reset the password in Jboss 7.1.

Hope this will help you. Kindly comment for your suggestion and quires.   

"Effort only fully releases its reward after a person refuses to quit.”

 Regards,

 Akhilesh B. Humbe

Wednesday 25 January 2017

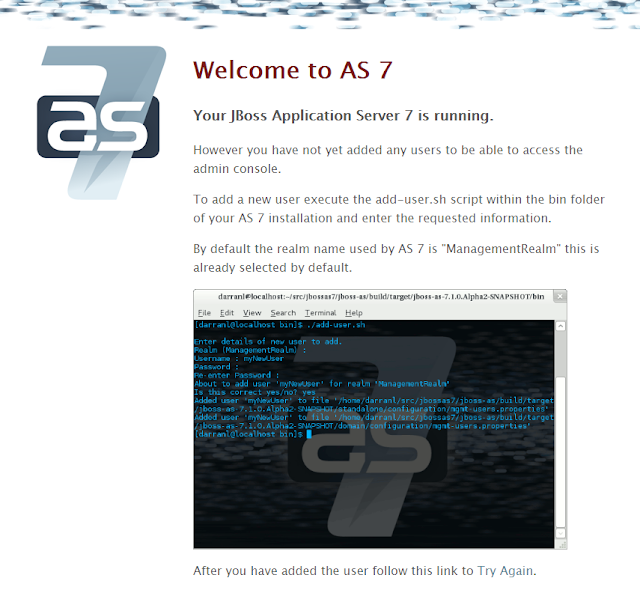
However you have not yet added any users to be able to access the admin console

Hello everyone,

After successful installation and start of Jboss and making it available for remote access  I was trying to access the admin console and not able to access it. I was trying to access it remotely by http://hostname:port/console and it was showing me below message on login screen

However you have not yet added any users to be able to access the admin console


So yes after installation of Jboss application server you need to add the admin user to perform the administration activities. And only admin user can allow you to access the administration console for jboss.

There are two types of users Management User and Application User and for accessing administration console create a Management User using below steps.

Procedure


Go to the below location /<JBOSS_HOME>/bin and run the command ./add-user.sh

What type of user do you wish to add? [use enter for default or type a for option admin user]
 a) Management User (mgmt-users.properties)
 b) Application User (application-users.properties)
(a): a

Enter the details of the new user to add. [Type user dtails]
Realm (ManagementRealm) : ManagementRealm
Username : admin
Password : ******
Re-enter Password :******
The username 'admin' is easy to guess
Are you sure you want to add user 'admin' yes/no? yes
About to add user 'admin' for realm 'ManagementRealm'
Is this correct yes/no? yes
Added user 'admin' to file '/opt/Akhil/jboss-as-7.1.1.Final/standalone/configuration/mgmt-users.properties'
Added user 'admin' to file '/opt/Akhil/jboss-as-7.1.1.Final/domain/configuration/mgmt-users.properties'

Refer the below screenshot for reference.


Go and check the file  /<JBOSS_HOME>/domain/configuration/mgmt-users.properties


Now try to access the admin console


Hope this will help you. Kindly comment for your suggestion and quires.   

"Effort only fully releases its reward after a person refuses to quit.”

 Regards,

 Akhilesh B. Humbe

Friday 20 January 2017

Not able to access the JBoss admin console remotely

Hello everyone,

After successful installation and start of Jboss Application server service I was trying to access the admin console and not able to access it. I was trying to access it remotely by http://hostname:port/console and it was showing blank screen and some errors.

To making your Jboss admin console available  for remote access you need to make some changes in standalone.xml

Procedure:


Go to the below location
/<JBOSS_HOME>/standalone/configuration/

Take a backup of the file standalone.xml

Open the file and search for the tab jboss.bind.address and make sure that jboss.bind.address value should be 0.0.0.0 , make the changes and save the file. You can refer the below screen shot


Restart the Jboss application services and try to access link
http://hostname:19990/console [port may different according to your configuration]


Hope this will help you. Kindly comment for your suggestion and quires.   

"Effort only fully releases its reward after a person refuses to quit.”

 Regards,

Thursday 19 January 2017

How to Change Default Ports in JBoss Application Server ?

Hello everyone,

After successful installation of Jboss application server I was getting below error in the server logs. And it's the port conflict. Because already some services running on the port 8080 it was showing
 
Caused by: LifecycleException:  Protocol handler initialization failed: java.net.BindException: Address already in use /127.0.0.1:8080


To resolve this issue you need to change the default ports of the Jboss application server or else you can stop the processes on the ports which were configure on Jboss.

But as it always recommend that never use the default ports on any application server as good practice of avoiding security hazards/vulnerability issues. Here I am listing down the steps to change the default ports of Jboss standalone profile.  


Procedure:


Go to the below location
/<JBOSS_HOME>/standalone/configuration/

Take a backup of the file standalone.xml or after change you can find the original file at
/<JBOSS_HOME>/standalone/configuration/standalone_xml_history/standalone.initial.xml

Open the file and edit the ports in <socket-binding-group /> tab. You can refer the below screen shot


Restart the Jboss service and check if new ports are updated.


Hope this will help you. Kindly comment for your suggestion and quires.   

"Effort only fully releases its reward after a person refuses to quit.”

 Regards,

Installation of JBoss Application Server v7.1

Hello everyone,

Happy New year to all. Hope you all are doing well. Today We are installing JBoss application Server community edition v7.1 on a LINUX box. Community edition is an open source and free to use and if you want to support from RedHat you need to install JBoss Enterprise Application Platform (EAP) which we were already discussed before in  link.

Procedure:


Installing JBoss is an easy process and administration is same as other Middleware technologies and as an open source it is a mostly used application server.

Installing JBoss Application Server


As JBoss doesn’t install it's own java environment like weblogic jRocket and Websphere SDK, you need to install the compatible version of java as a prerequisites of JBoss installation.

You can down compatible .zip/.tar file or .rpm file from the oracle side and install it. In our case I have downloaded below file which is compatible JBoss 7.1
jdk-7u21-linux-i586.tar

Next step is to download the JBoss application server. You can download latest version of JBoss Application Server from http://jbossas.jboss.org/downloads/


We have downloaded the below  file
jboss-as-7.1.1.Final.zip

Install the java, to install the java you need to extract the jdk-7u21-linux-i586.tar file
tar -xvf  jdk-7u21-linux-i586.tar

Install JBoss, to install the JBoss you need to extract the jboss-as-7.1.1.Final.zip
unzip jboss-as-7.1.1.Final.zip

And here you have completed the installation of JBoss application server. This is the most simplest application server to install. Now lets see how to start the JBoss Application Server services in LINUX.

Starting  JBoss Services


To start the JBoss service goto the JBOSS_HOME/bin and execute the command ./standalone.sh. When I first time executed this command  I got a below error.

./standalone.sh: line 178: java: command not found


As I don’t have java installed as a rpm my JAVA_HOME is not set. And we have already discussed that JBoss required external java to run, so we need to set the JAVA_HOME before executing the start command. 
We can do that in multiple ways.

We can set it foe specific putty session by command
Export JAVA_HOME=/opt/jdk1.7.0_21

Or you can set it in standalone.conf as JAVA_HOME=/opt/jdk1.7.0_21. Here I have set it in standalone.conf so I don’t need to set it every time for every new putty session.

Now execute the command ./standalone.sh 


Access the admin console from below link

http://localhost:19990/console [port may change according to your configuration]


Hope this will help you. Kindly comment for your suggestion and quires.   

"Effort only fully releases its reward after a person refuses to quit.”

 Regards,

Popular Posts