Hi everyone,
As a part of
Security baseline it is always recommend that don’t use the default SSL
certificate for Websphere application server, because default certificate
display host name of your server. Se here we create the Self signed certificate
and configure it. It is very simple task in case of webspher application
server.
Before going
to configure the SSL with Websphere, we need to know the basic things about SSL
What is SSL?
SSL is an
acronym for Secure Sockets Layer. The primary reason why SSL is used is to keep
sensitive information sent across the Internet encrypted so that only the
intended recipient can understand it. This is important because the information
you send on the Internet is passed from computer to computer to get to the
destination server. Any computer in between you and the server can see your
sensitive information if it is not encrypted with an SSL certificate. When an
SSL certificate is used, the information becomes unreadable to everyone except
for the server you are sending the information to. This protects it from
hackers and identity thieves.
To know more
about SSL go through this link https://calomel.org/ssl_certs.html
Procedure :
There are different methods to complete this task, but I always follow the bellow sequence to complete this Task.
1. Creating SSL
kyestore and SSL certificate for an application server.
2. Creating SSL
Configuration using new certificate
3. Configuring
SSL Configuration and SSL certificate.
4. Configuring
a browser to work with certificates.
Creating SSL
kyestore and SSL certificate for an application server.
A Java KeyStore (JKS) is a repository of security certificates,
either authorization certificates or public key certificates, used for instance
in SSL encryption.
Procedure:
1. Navigate to Security
> SSL certificate and key management > Key stores and certificates > in
KeyStore Usages select SSL KeyStore and click on New.

2. Enter The
data in following field. e.g.
Name
:TestKey
Path
:$WAS_HOME/profiles/AppSrv01/etc/TestKey.jsk.
Type :JSK
Click on Apply
and save.


3. Once you
created a keystore, create a SSL certificate and for that navigate to
SSL
certificate and key management > Key stores and certificates >
TestKey > Personal certificates then click on Create
Self-Signed Certificate.


4. Type in all
required fields e.g.
Alias name : TestCertificate
(The alias identifies the certificate request in the keystore).
Common name
: TestCertificate (CN) value. This value is the CN value in the certificate
distinguished name (DN).
Validity
period :
The default validity period value is 365 days.

Click on Apply
and save.


1. To create
new SSL configuration navigate to SSL certificate and key management >
SSL configurations and click New.


2. In following
Screen Type following Information.
Name : TestCertificate
Trust Stote Name : TestKeyStore
Key Stote Name : TestKeyStore
Then Click on Get Certificate Aliases.
Then click on apply and save.

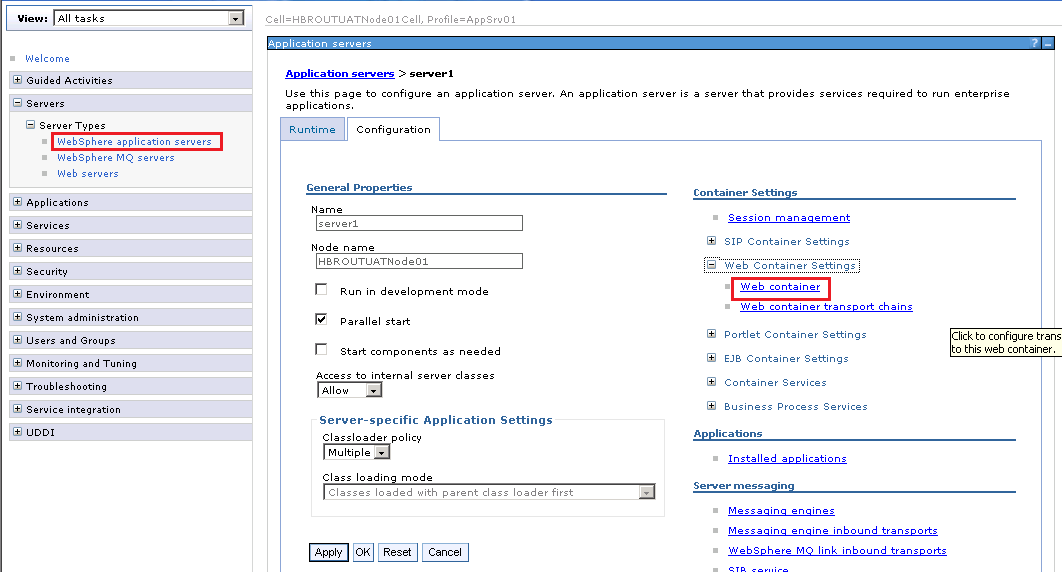
Configuring
SSL Configuration and SSL certificate.
1. Navigate to Servers> Websphere Application Server
> Server1 > Web Container Setting > Web Container
2. Click on WCInboundDefaultSecure > SSL inbound
channel (SSL_2)

3. In SSL
configuration select the TestCertificate.

4. Click on
Apply and Save.
5. Repeat the Step 1 to 4 for the WCInboundAdminSecure

6. Restart Server to activate the changes

Here we done with the all required stuffs for SSL configuration,
now on thing is left that is to configure the web browser for to use new
certificate. For that we need to follow the bellow steps.
After the configuration of SSL on websphere application server
perform the following steps to configure browser for same.
1. When you go
to the Internet Explorer and looking for WAS administration console you will
get the following screen. Click on Certificat Error
and then on View Certificates and you will get the certificate detail.

2. This is the
new SSL certificate which we had created and configured.

3. Click on Install
Certificate for install it on your system as a trusted certificate and then
click Next

4. In Certificate Store wizard select store and click Next


5. Click on finish and then you will get
The import was successful.

6. Now navigate
to Tools>Internet Options>Content>Certificates and check for
your certificate name in Internet Explorer.

8. Click Tools
> Internet Options > Advanced. Scroll down and clear the Warn about
certificate address mismatch check box. Click OK. Close Internet Explorer

9. Now open the
new tab and try to access the WAS administration console and you will get the
following output.

Hope this will work for you also..
Effort only fully
releases its reward after a person refuses to quit.”
Regards,


No comments:
Post a Comment